Difference between revisions of "ATV1200"
(→User Manual) |
|||
| (24 intermediate revisions by 2 users not shown) | |||
| Line 1: | Line 1: | ||
| + | |||
| + | [[File:atv1200.png|right]] | ||
| + | '''The ATV1200''' | ||
| + | '''Operating system''' Android 4.2.2 | ||
| + | '''Power''' 12 volts | ||
| + | '''CPU''' Amlogic A9 | ||
| + | '''Memory''' 1GB DDR3 | ||
| + | '''Storage''' 8GB | ||
| + | '''Graphics''' Mali400 | ||
| + | '''Sound''' A/V, HDMI, S/PDIF | ||
| + | '''Connectivity''' IEEE 802.11 b/g/n 10/100 Ethernet | ||
| + | |||
| + | |||
= History = | = History = | ||
| − | The ATV1200 was released in 2013 as the first official successor to the MyGica. It is equiped with a | + | The ATV1200 was released in 2013 as the first official successor to the MyGica. It is equiped with a dual core Amlogic A9 and the Mali400 video processor. It is capable of scaled 1080p playback, as well as nonscaled 1080p playback. |
This was the first Mygica device to support OTA updating and also migrated from 4.1 to android 4.2 | This was the first Mygica device to support OTA updating and also migrated from 4.1 to android 4.2 | ||
| Line 12: | Line 25: | ||
There are two different remotes came out with ATV1200 | There are two different remotes came out with ATV1200 | ||
| − | + | [[File:Kr34.jpg|link=Kr34]] | |
| + | [[File:Kr60.png|link=Kr60]] | ||
| − | 2. KR60 | + | |
| + | There are two type of Remotes for MyGica ATV1200 | ||
| + | |||
| + | 1. KR34 | ||
| + | 2. KR60 | ||
= User Manual = | = User Manual = | ||
| − | + | Here is user manual in PDF [http://mygica.com/download/Manual/MyGica_ATV1200_Manual.zip] | |
| + | |||
| + | Here is our Video Manual [[ATV1200VideoManual]] | ||
| + | |||
| + | |||
| + | '''Inputs/Outputs Version 1''' | ||
| + | |||
| + | '''Back''' | ||
| + | 1. 12 Volt Power Connection | ||
| + | 2. RCA & Component Connections | ||
| + | 3. S/PDIF | ||
| + | 4. HDMI 1.3 | ||
| + | 5. Ethernet 10/100 Full Duplex Port | ||
| + | |||
| + | [[File:ATV1200-back.png]] | ||
| + | |||
| + | '''Inputs/Outputs Version 2''' | ||
| + | |||
| + | '''Back''' | ||
| + | 1. 12 Volt Power Connection | ||
| + | 2. RCA Connections | ||
| + | 3. S/PDIF | ||
| + | 4. HDMI 1.3 | ||
| + | 5. Ethernet 10/100 Full Duplex Port | ||
| + | |||
| + | [[File:ATV1200V2.png]] | ||
| + | |||
| + | '''Side V1 & V2''' | ||
| + | |||
| + | 1. 4 USB 2.0 Ports | ||
| + | 2. SD Card Slot | ||
| + | |||
| + | [[File:ATV1200-side.png]] | ||
| + | |||
| + | <!-- End of Manual --> | ||
= Tips and Tricks = | = Tips and Tricks = | ||
| Line 25: | Line 77: | ||
| − | |||
| − | |||
== Enabling Developer Options == | == Enabling Developer Options == | ||
| − | + | 1. First Select Settings. | |
| − | = | + | [[File:01.png]] |
| + | |||
| + | 2. Scroll Down and Select Developers Option | ||
| + | |||
| + | [[File:02.png]] | ||
| + | |||
| + | 3. Select USB debugging, and Click ok | ||
| + | |||
| + | [[File:03.png]] | ||
| + | |||
| + | = Common Troubleshooting = | ||
== Cache Wipe Failed == | == Cache Wipe Failed == | ||
| + | <youtube>B7z4o6yW3VE</youtube> | ||
| − | |||
Here is yet another 101 video on how to master reset your MyGica ATV1200 | Here is yet another 101 video on how to master reset your MyGica ATV1200 | ||
| Line 43: | Line 103: | ||
Why Hard Reset: | Why Hard Reset: | ||
| − | 1. If your box is not functioning properly | + | 1. If your box is not functioning properly |
| − | + | ||
| − | + | ||
| − | + | ||
| − | + | ||
| − | + | 2. Having a lot of issue with your apps | |
| − | + | 3. WiFi is not connecting | |
| − | + | 4. screen freezing a lot | |
| − | + | 5. You want to give the box to someone for good and want everything wiped | |
| − | = | + | = Boot loop, Soft Brick, Recovery Screen = |
| − | == | + | For BootLoop or Stuck at Recovery Screen and Remote not fuctioning |
| + | |||
| + | Follow these steps to help, Click on the Picture | ||
| + | |||
| + | [[File:STUCK.png|link=RecoveryScreenATV1200]] | ||
| + | |||
| + | == Upgrading Kodi == | ||
| + | |||
| + | <youtube>CJA6zyb68yM</youtube> | ||
== XBMC shrank, or not full-size display == | == XBMC shrank, or not full-size display == | ||
| + | |||
| + | We have Video Walk through for this too | ||
| + | |||
| + | <youtube>7lSDk7Dnyjk</youtube> | ||
Latest revision as of 15:52, 29 April 2016
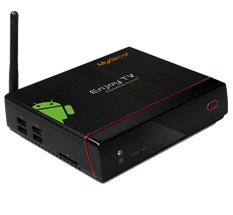
 The ATV1200
 Operating system          Android 4.2.2
 Power                     12 volts
 CPU                       Amlogic A9
 Memory                    1GB DDR3
 Storage                   8GB
 Graphics                  Mali400
 Sound                     A/V, HDMI, S/PDIF
 Connectivity              IEEE 802.11 b/g/n  10/100 Ethernet
Contents
History
The ATV1200 was released in 2013 as the first official successor to the MyGica. It is equiped with a dual core Amlogic A9 and the Mali400 video processor. It is capable of scaled 1080p playback, as well as nonscaled 1080p playback. This was the first Mygica device to support OTA updating and also migrated from 4.1 to android 4.2
Firmware & Re-flashing
For all firmware and re-flashing related issues with the ATV1200, see the ATV1200-firmware article.
Remotes
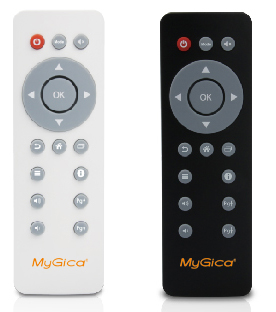
There are two different remotes came out with ATV1200
There are two type of Remotes for MyGica ATV1200
1. KR34 2. KR60
User Manual
Here is user manual in PDF [1]
Here is our Video Manual ATV1200VideoManual
Inputs/Outputs Version 1
 Back
 1. 12 Volt Power Connection
 2. RCA & Component Connections
 3. S/PDIF
 4. HDMI 1.3
 5. Ethernet 10/100 Full Duplex Port
Inputs/Outputs Version 2
 Back
 1. 12 Volt Power Connection
 2. RCA Connections
 3. S/PDIF
 4. HDMI 1.3
 5. Ethernet 10/100 Full Duplex Port
Side V1 & V2
 1. 4 USB 2.0 Ports
 2. SD Card Slot
Tips and Tricks
This is for advanced users only. Changing these settings without proper knowledge can lead to catastrophic consequences.
Enabling Developer Options
1. First Select Settings.
2. Scroll Down and Select Developers Option
3. Select USB debugging, and Click ok
Common Troubleshooting
Cache Wipe Failed
Here is yet another 101 video on how to master reset your MyGica ATV1200
Why Hard Reset:
1. If your box is not functioning properly
2. Having a lot of issue with your apps
3. WiFi is not connecting
4. screen freezing a lot
5. You want to give the box to someone for good and want everything wiped
Boot loop, Soft Brick, Recovery Screen
For BootLoop or Stuck at Recovery Screen and Remote not fuctioning
Follow these steps to help, Click on the Picture
Upgrading Kodi
XBMC shrank, or not full-size display
We have Video Walk through for this too


